
- Content:
- ...
- 1. Introduction
- 2. Adding V2 liquidity through the interface
- 2.1. Adding V2 liquidity using the Pancakeswap interface
- 2.2. Adding V2 liquidity using the Uniswap interface
- 3. Adding V2 liquidity through the interface
- 3.1. Addresses of routers of various DEXs
- 3.2. How to add liqudiity through a smart contract
INTRODUCTION
When creating your own crypto token, one of the main steps is to provide liquidity. This is the action that allows investors to trade a token, buy and sell it.
In the world of decentralized finance, trading of crypto assets goes on DEX exchanges such as Uniswap, Pancakeswap and others.
And in order to allow investors to trade your token on these exchanges, developers need to provide liquidity for their token themselves.
Most of decentralized exchanges use Uniswap V2 protocols as they are quite simple, reliable and easily integrated into token smart contracts. And today we will take a detailed look at the process of adding liquidity for the V2 protocol.

Adding V2 liquidity using the Pancakeswap interface
So let's look at providing liquidity using an interface using Pancakeswap as an example.
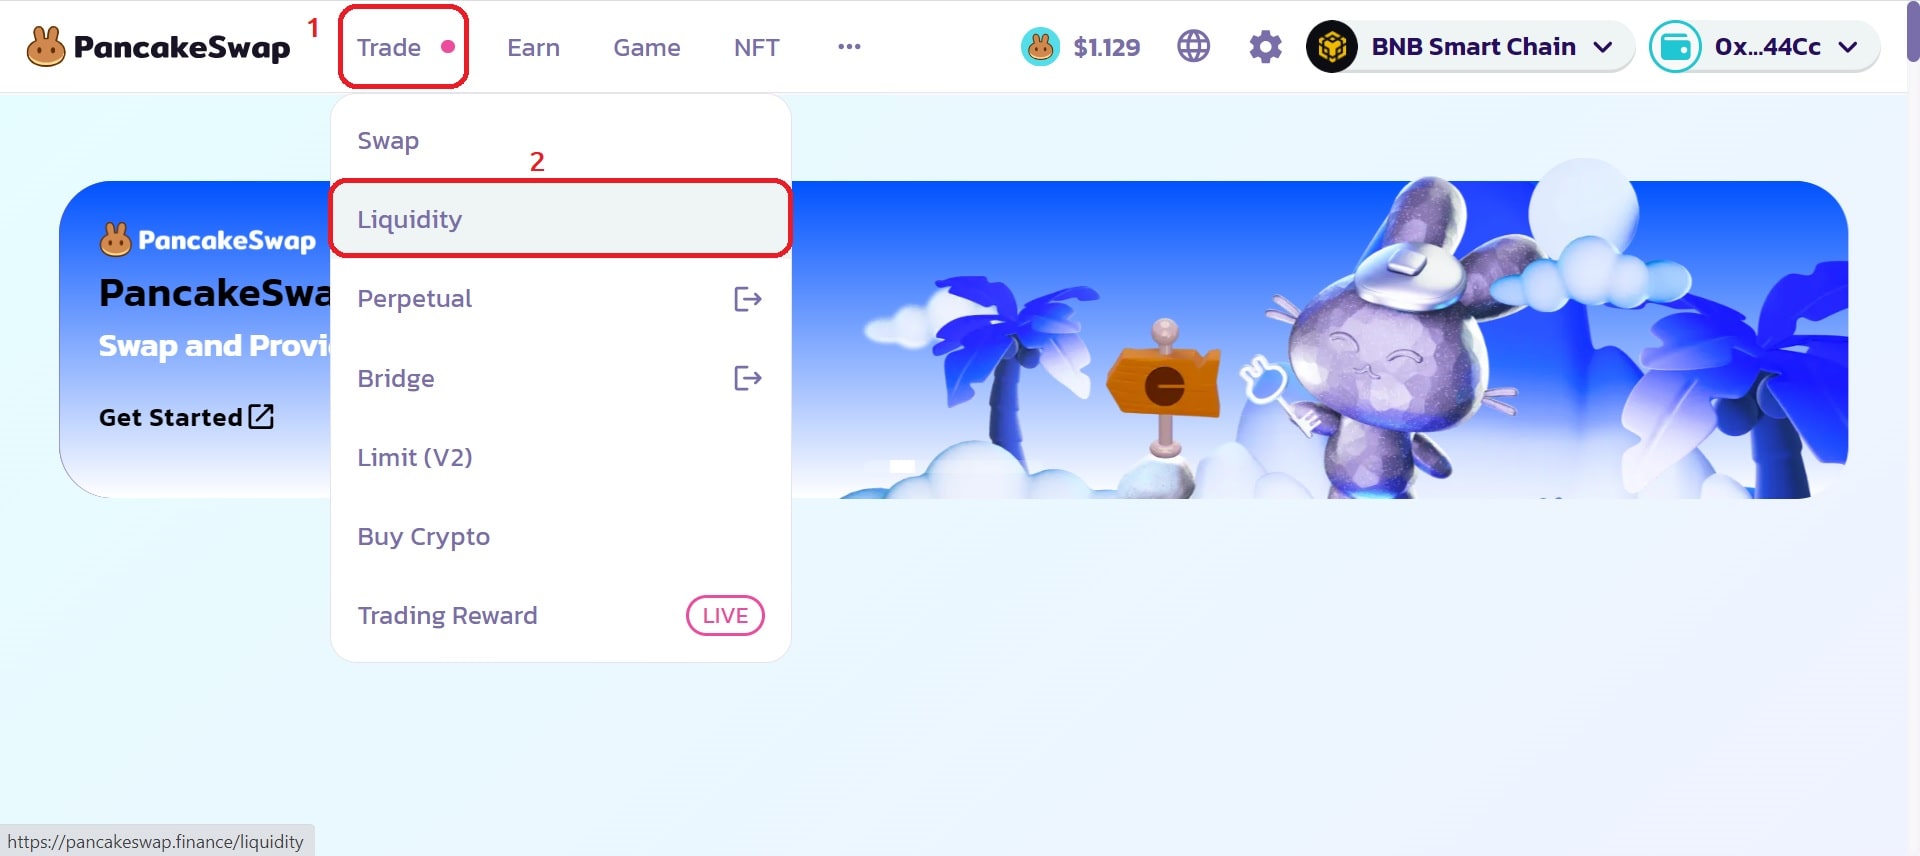
To do this, go to the pancakeswap.finance ➥ website and go to the liquidity section.
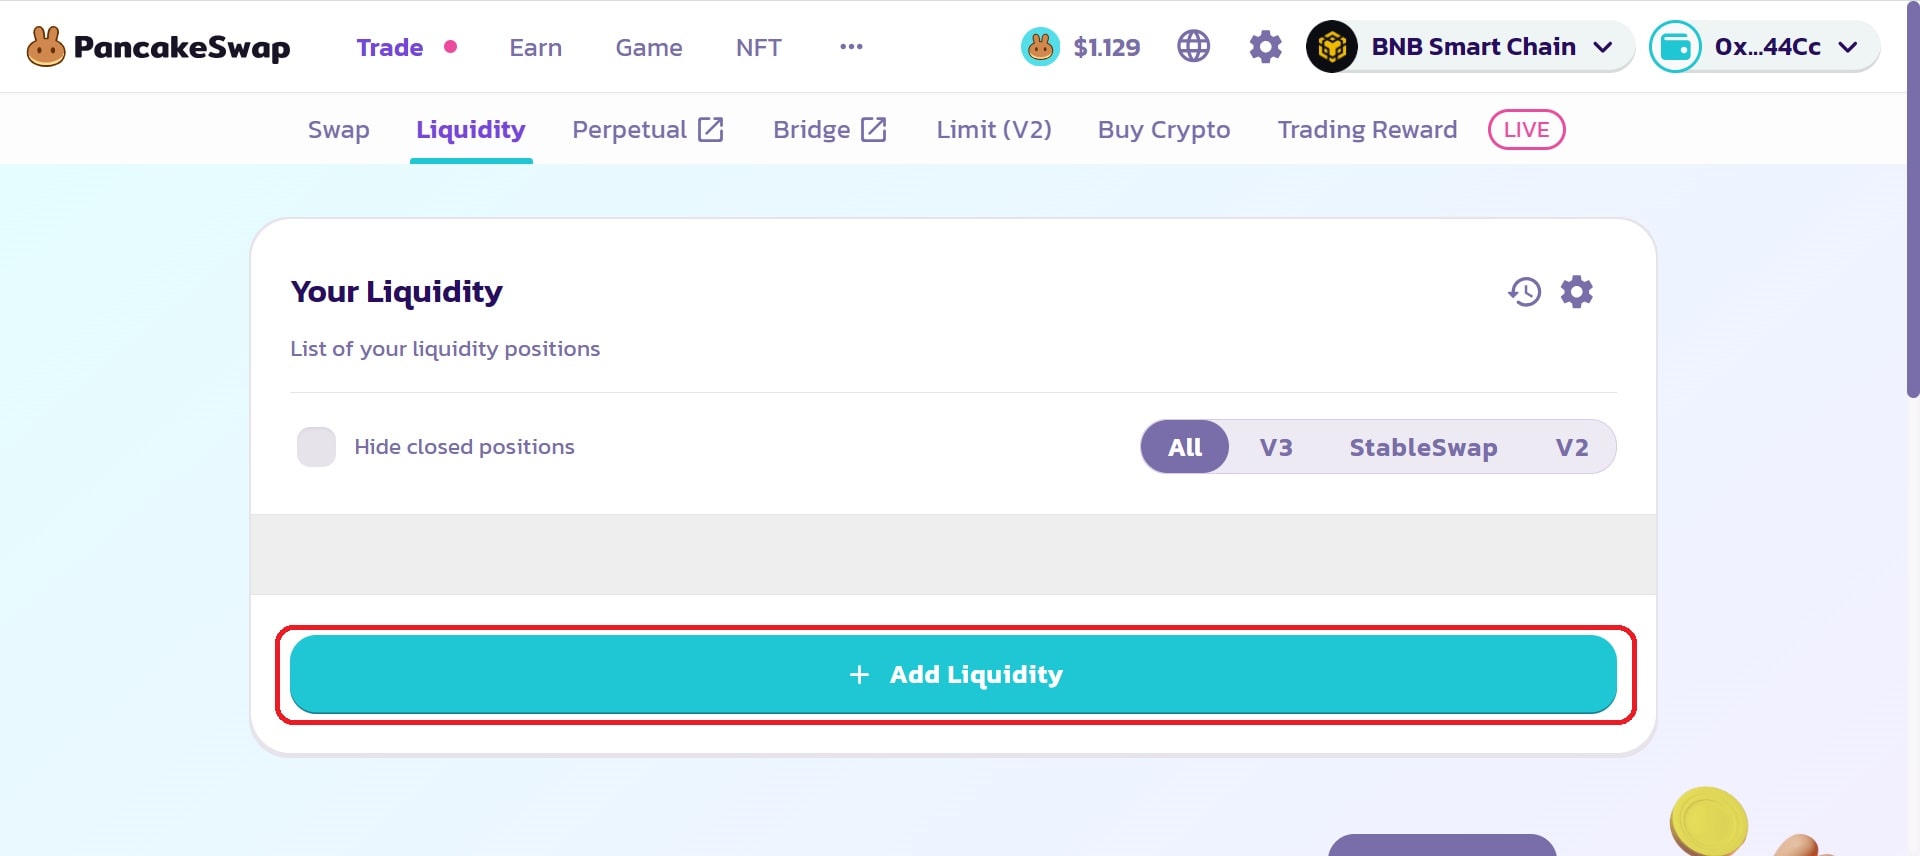
The first thing you will see is a list of your positions, or a list of liquidities you have provided. And to provide liquidity you need to click on the button with the corresponding name, as shown in the picture.
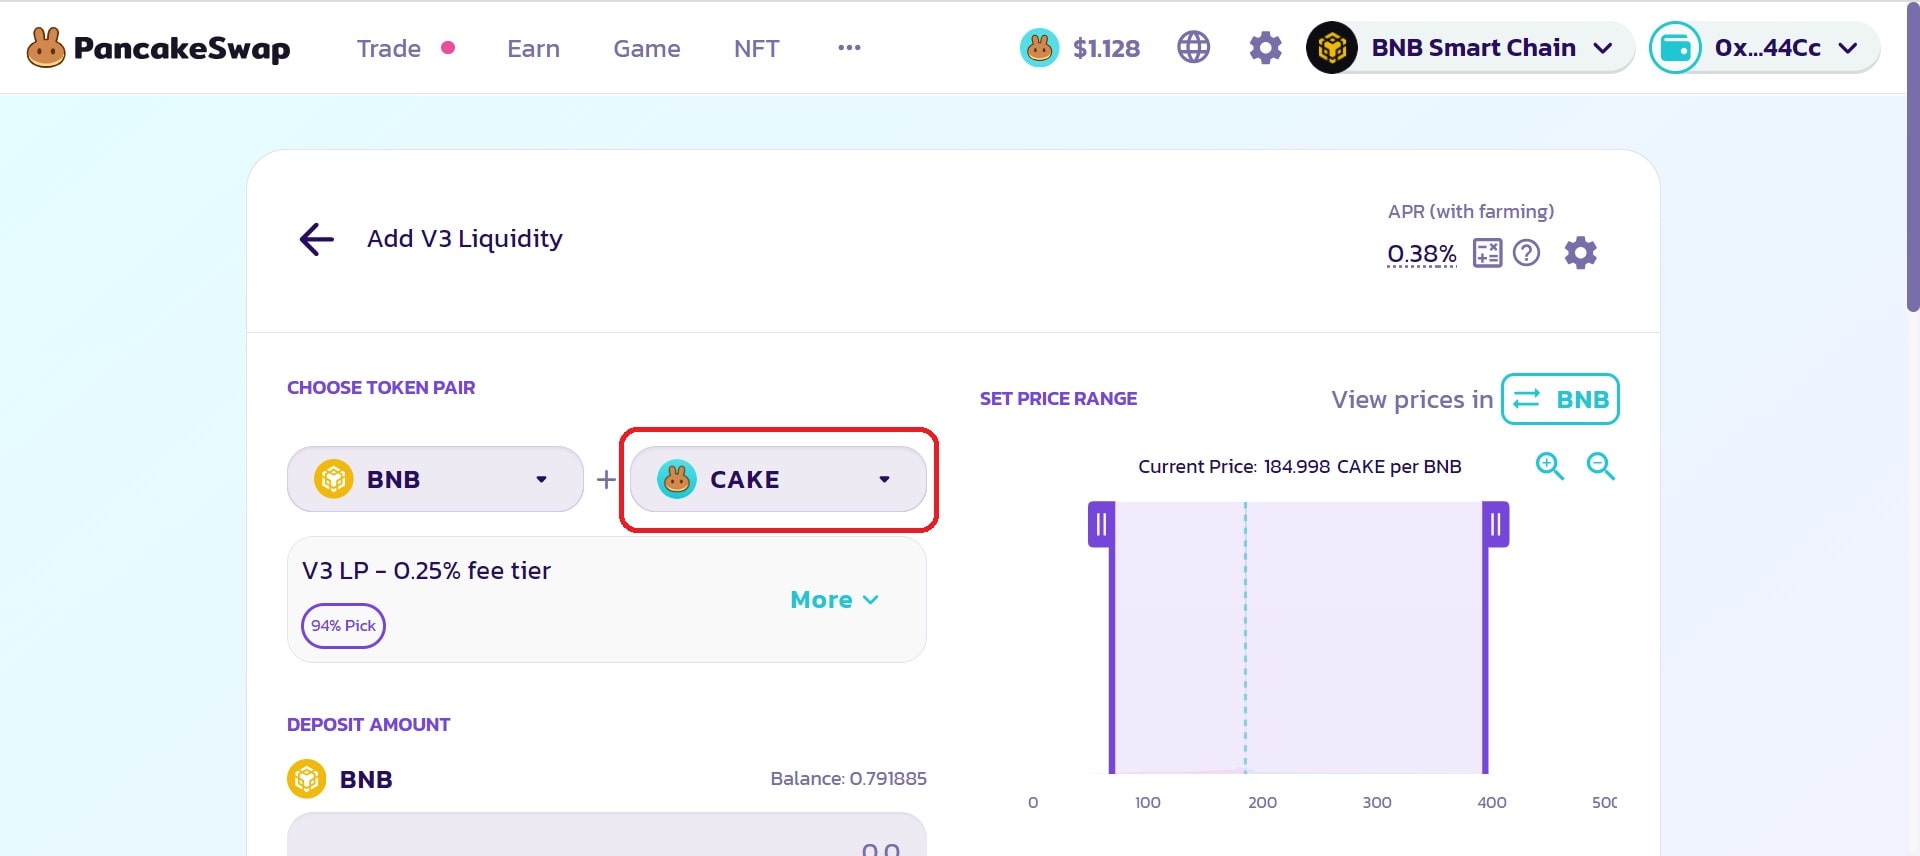
And now, this is the panel in which the most important part will take place. The first thing we need to do is select a pair of tokens for which we will provide liquidity.
The token on the left side is the currency for which investors will buy your crypto token. By default this is BNB, Ethereum or whatever native currency of the blockchain you are currently use. This is an excellent choice, so we will leave it unchanged.
The token on the right side is CAKE by default, this is where your token should be. Click on the button marked in the illustration below to select your token.
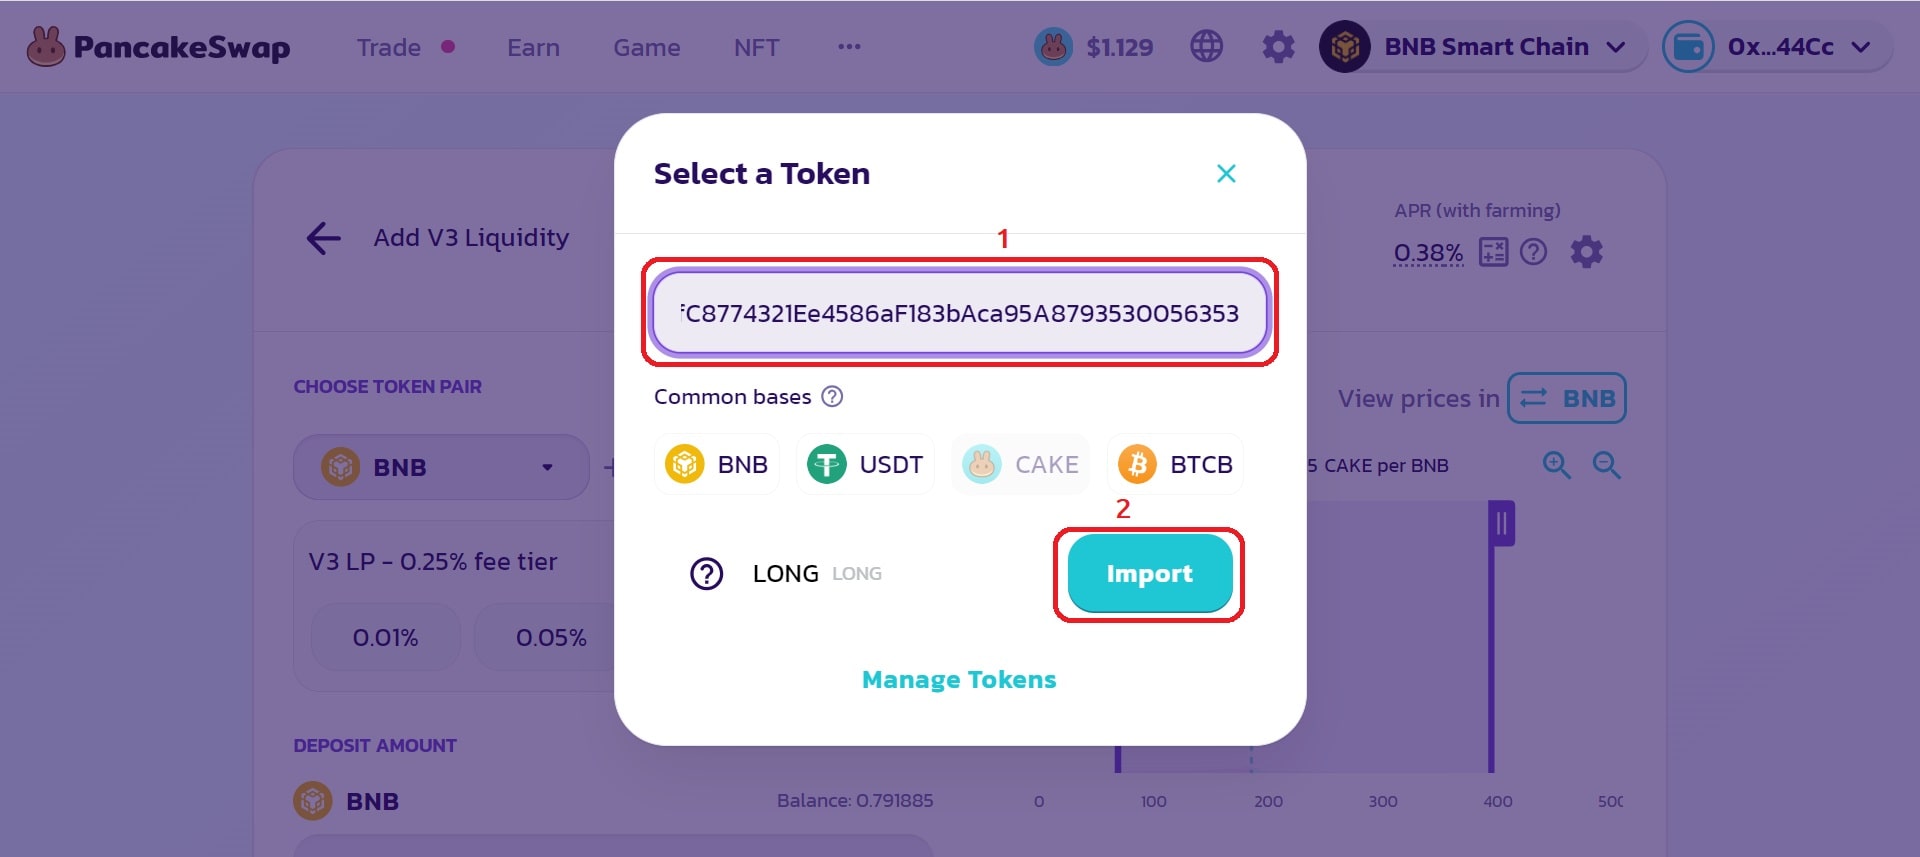
A panel will open in front of you, into which you need to insert the smart contract address of your token in field 1. And then, making sure that it is your token, click on the “Import” button number 2 in the illustration below.
Next, you will be shown a pop-up warning window. You can safely ignore it, and by checking the box next to “I acknowledge the risk”, click the Proceed button.
After this, the pop-up window will close and you will see the same liquidity addition panel.
Now, the most important point. By default we are prompted to add V3 liquidity, but now we must choose to provide V2 liquidity. Do this as shown in the illustration below:
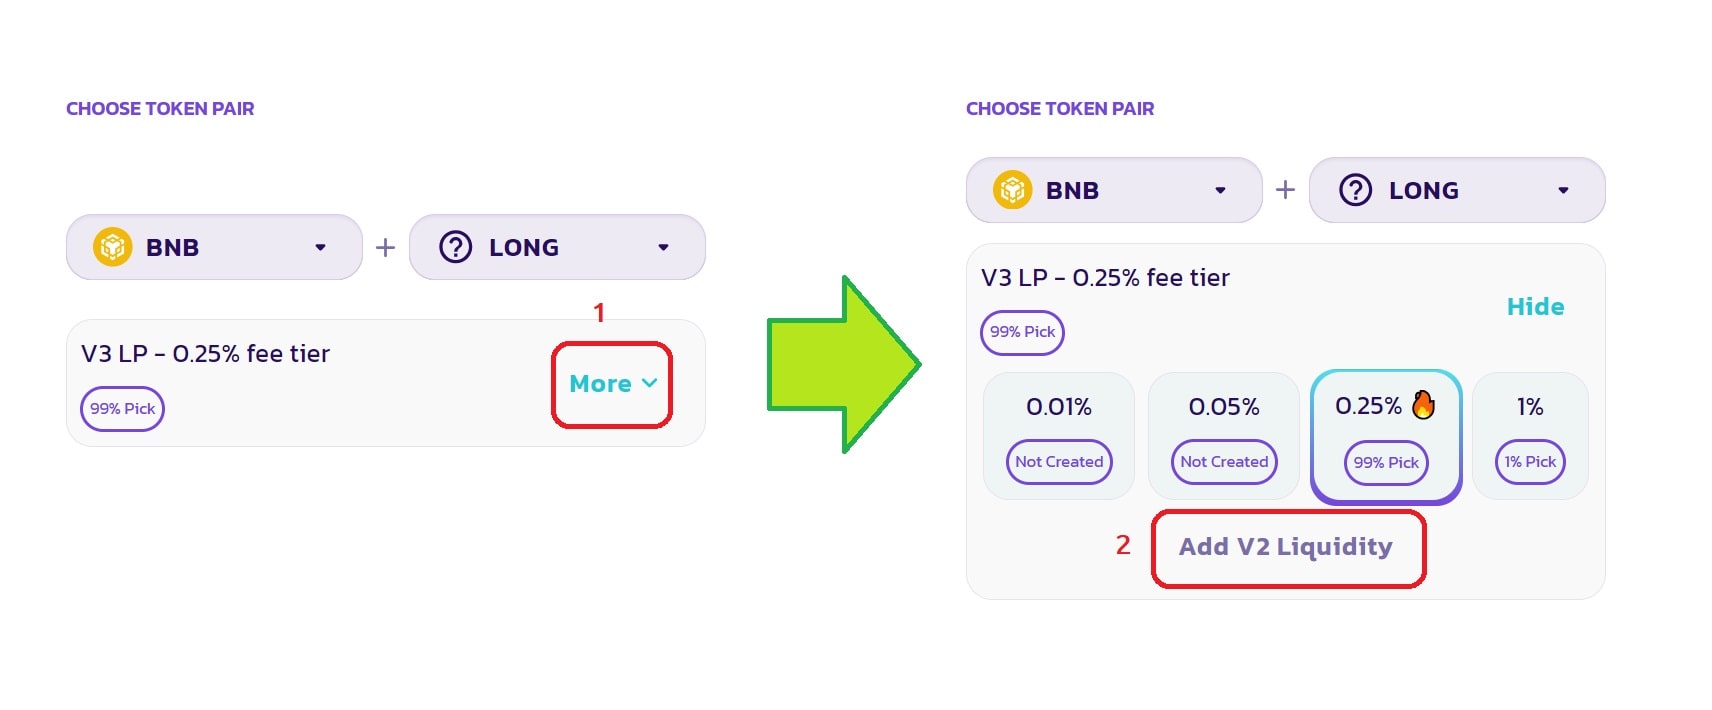
After this, in the fields below, you will be asked to enter the amount of each of the tokens that you wish to provide for liquidity. This is an example demo, but in a real project it is recommended to provide the entire total supply of your token and as much BNB as possible.
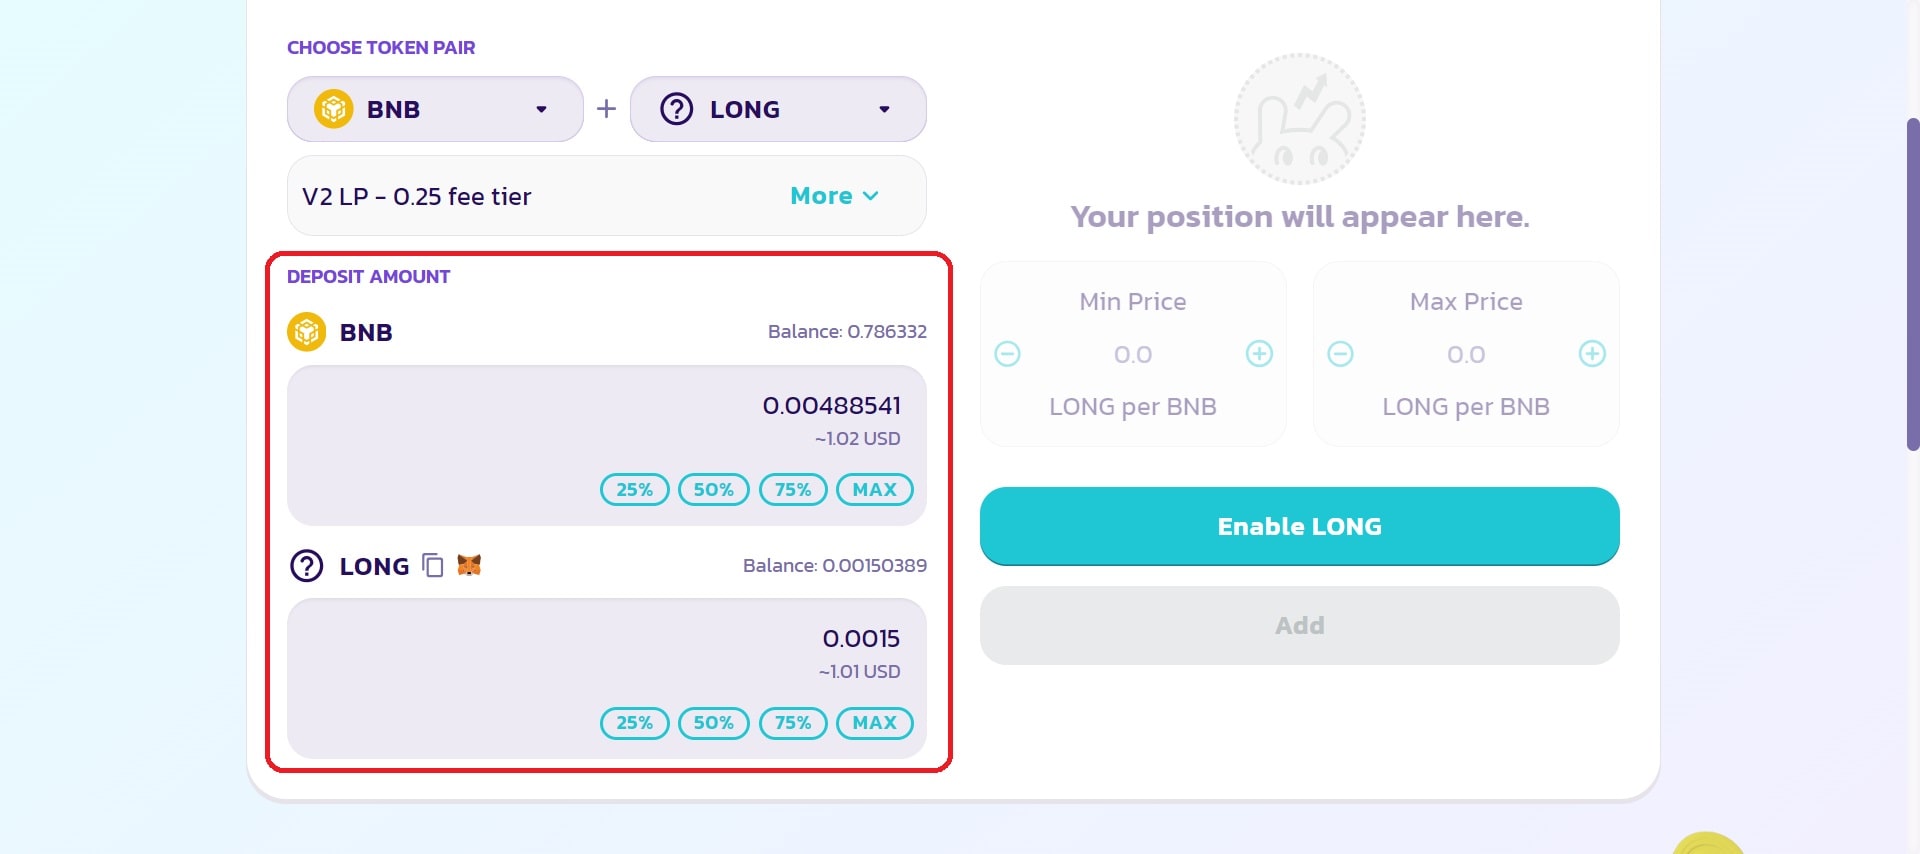
Next, you need to click on the “Enable LONG” button, but instead of LONG there will be a ticker of your token. Then sign the Metamask transaction to allow Pancakeswap to transfer your tokens to the liquidity pool.
And then click the "Add" button and sign the Metamask transaction to provide liquidity!
Congratulations, investors can now trade your token. After providing liquidity, you receive LP tokens in your wallet.
Adding V2 liquidity using the Uniswap interface
Now let's look at providing liquidity on Uniswap, an equally popular decentralized exchange primarily used on the Ethereum network.
The first thing you need to do is go to app.uniswap.org ➥ and go to the Pools section in the top menu.
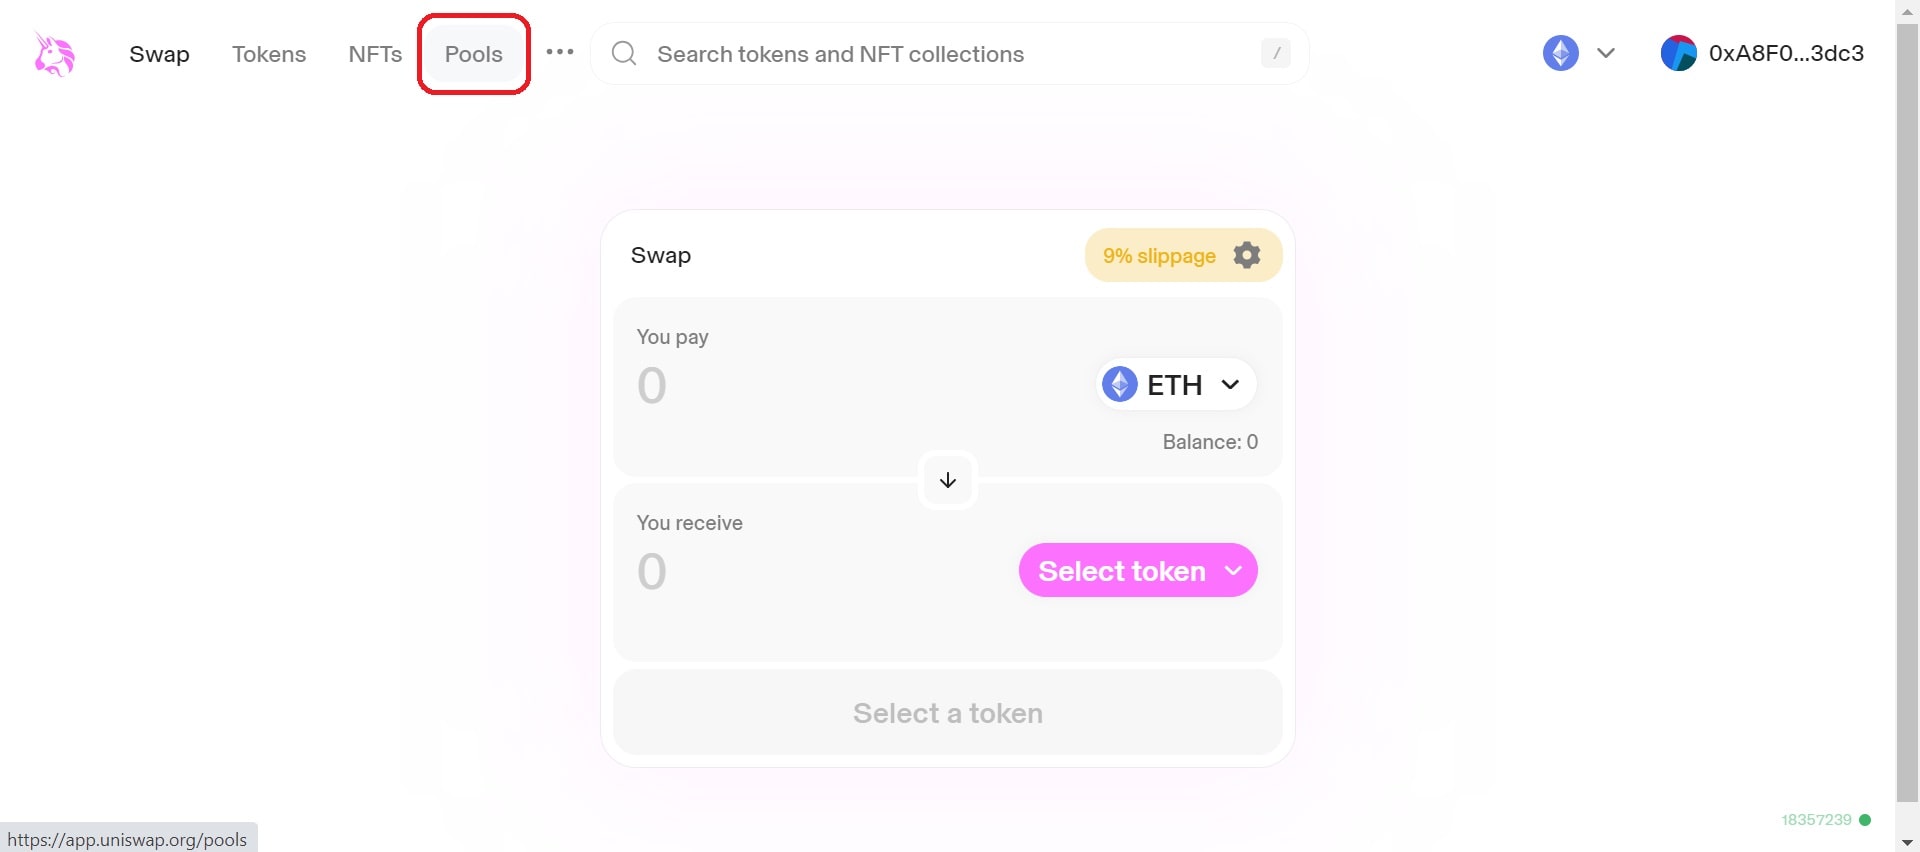
Next, go to the section for interacting with version 2 protocols, as shown in the illustration below. "More" -> "V2 liquidity".
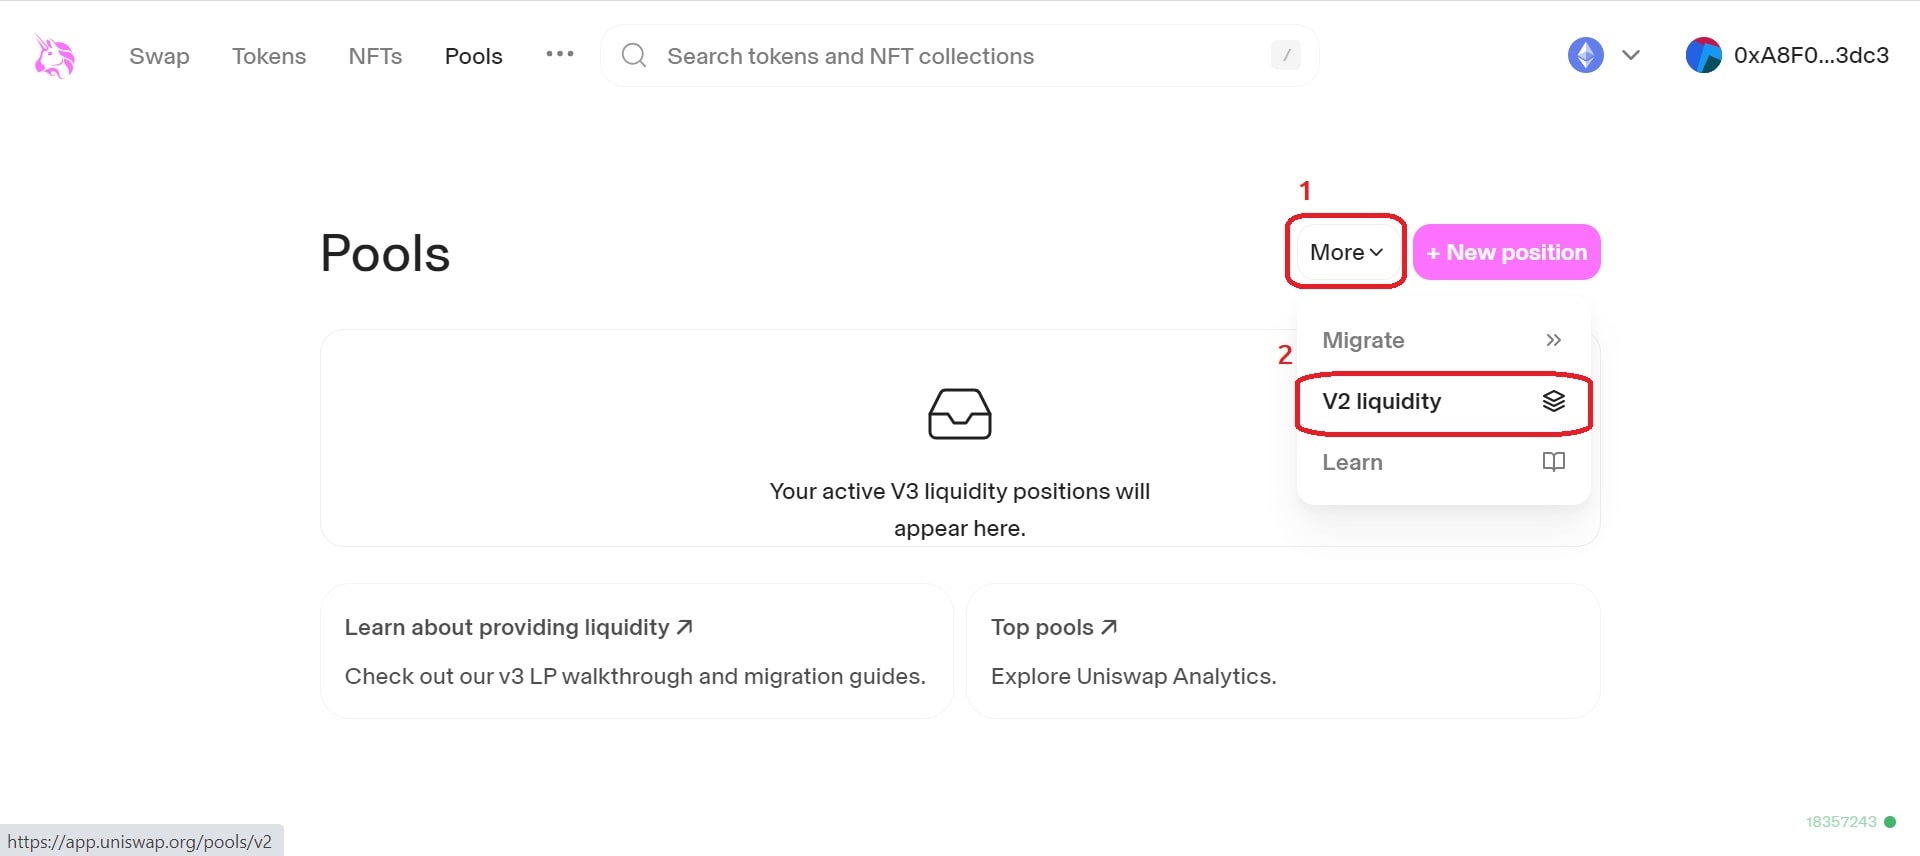
Here you are taken to the page for managing your V2 liquidity positions. Click on the "Create a pair" button
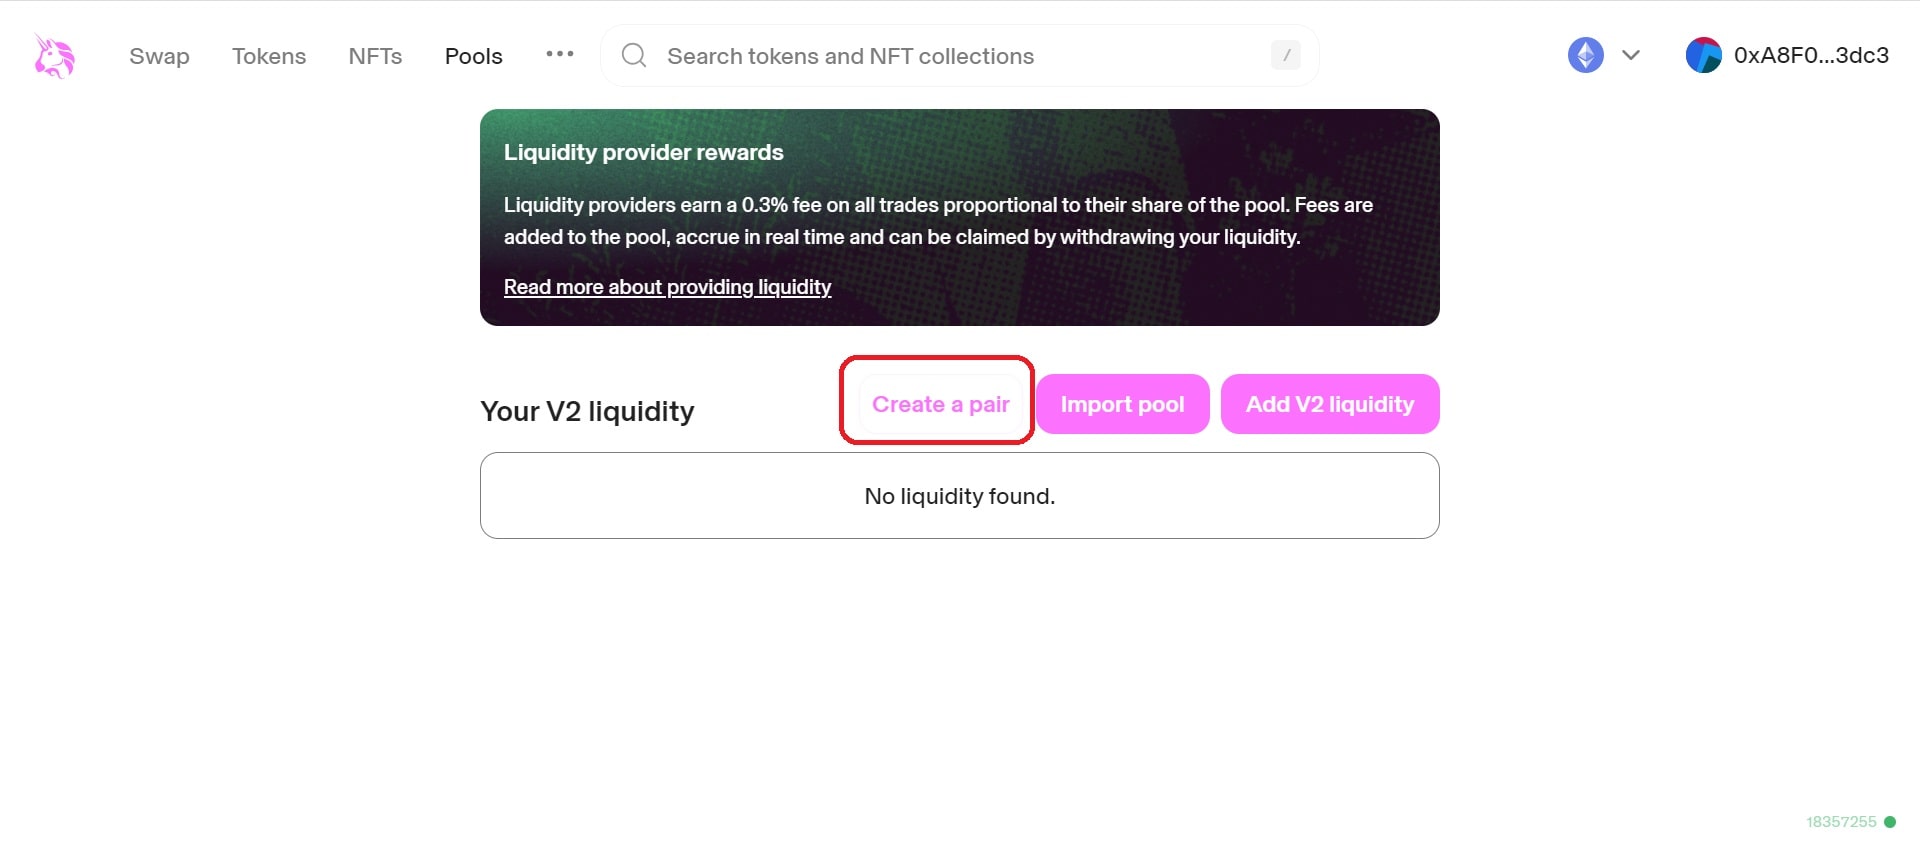
And now you facing the familiar menu that we looked at earlier using Pancakeswap as an example. You still have to select the token for which you want to provide liquidity, enter the desired number of tokens, approve the spending of the token you created, and conduct the liquidity providing transaction.
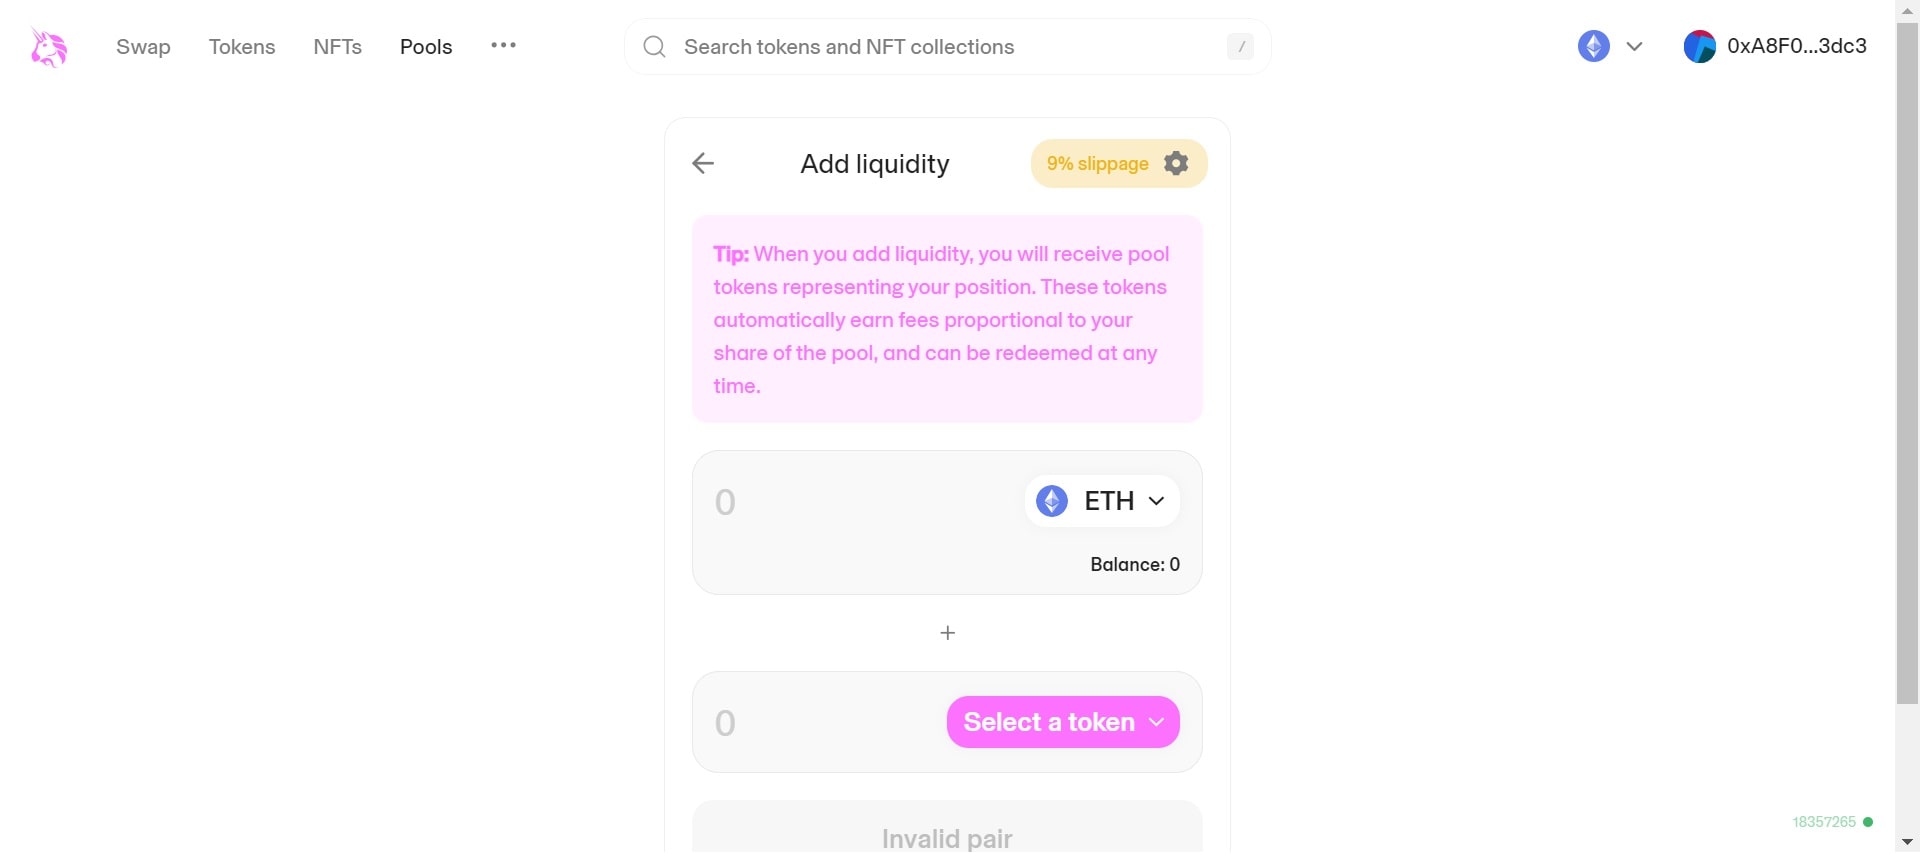
After this, you will still receive LP tokens that represent your share (100%) in the liquidity pool.
As you can see, providing liquidity using the interface is not a very difficult task and anyone can handle it.
Adding liquidity directly through a smart contract
Some DEX exchange interfaces may not support the provision of V2 liquidity, even if V2 liquidity smart contracts are supported and used. In such cases, you have to add liquidity by interacting directly with smart contracts. A striking example would be Sushiswap on the Arbitrum network.
This may not be such an easy task for a beginner, but it is still possible! Plus givenThe best way is that it is universal for all blockchains and Dex exchangers, since they all use the same protocol - a fork of Uniswap V2.
The first thing you will need is the smart contract address of the DEX exchanger router.
Below is a table of router smart contracts for different networks depending on the exchanger:
Addresses of routers of various DEXs
=Uniswap=
Ethereum - 0x7a250d5630B4cF539739dF2C5dAcb4c659F2488D
Ethereum Goerli - 0x7a250d5630B4cF539739dF2C5dAcb4c659F2488D
=Pancakeswap=
Binance Smart Chain - 0x10ED43C718714eb63d5aA57B78B54704E256024E
Binance Smart Chain Testnet - 0xD99D1c33F9fC3444f8101754aBC46c52416550D1
=Sushiswap=
Ethereum - 0xd9e1cE17f2641f24aE83637ab66a2cca9C378B9F
Binance Smart Chain - 0x1b02dA8Cb0d097eB8D57A175b88c7D8b47997506
Arbitrum One - 0x1b02dA8Cb0d097eB8D57A175b88c7D8b47997506
Polygon - 0x1b02dA8Cb0d097eB8D57A175b88c7D8b47997506
=PulseX=
Pulse Chain - 0x98bf93ebf5c380C0e6Ae8e192A7e2AE08edAcc02
Having selected the one you need, you need to go to the smart contract interface of your token and find the approve() function. You can do this in a block scanner (if you have verified and published the source code of your smart contract) or in Remix IDE.
For example, we will choose the same Uniswap in the Ethereum network, so the selected address will be:
0x7a250d5630B4cF539739dF2C5dAcb4c659F2488D
In the approve() function, we specify the address of the Uniswap router as _spender. And as _value is the desired number of tokens that we plan to provide for liquidity. To do this, I will copy the value that the totalSupply() function returns:
Note: Please note that in _value you must specify a value taking into account the decimals of your token. If you want to provide 150,000,000 of your tokens, but the decimals of your token is 18, then this means that you will have to add 18 more zeros to the end, as shown in the example below.
Connect your wallet to the block scanner. If it is connected, there will be a green circle on the "Connected" label, as in the example.
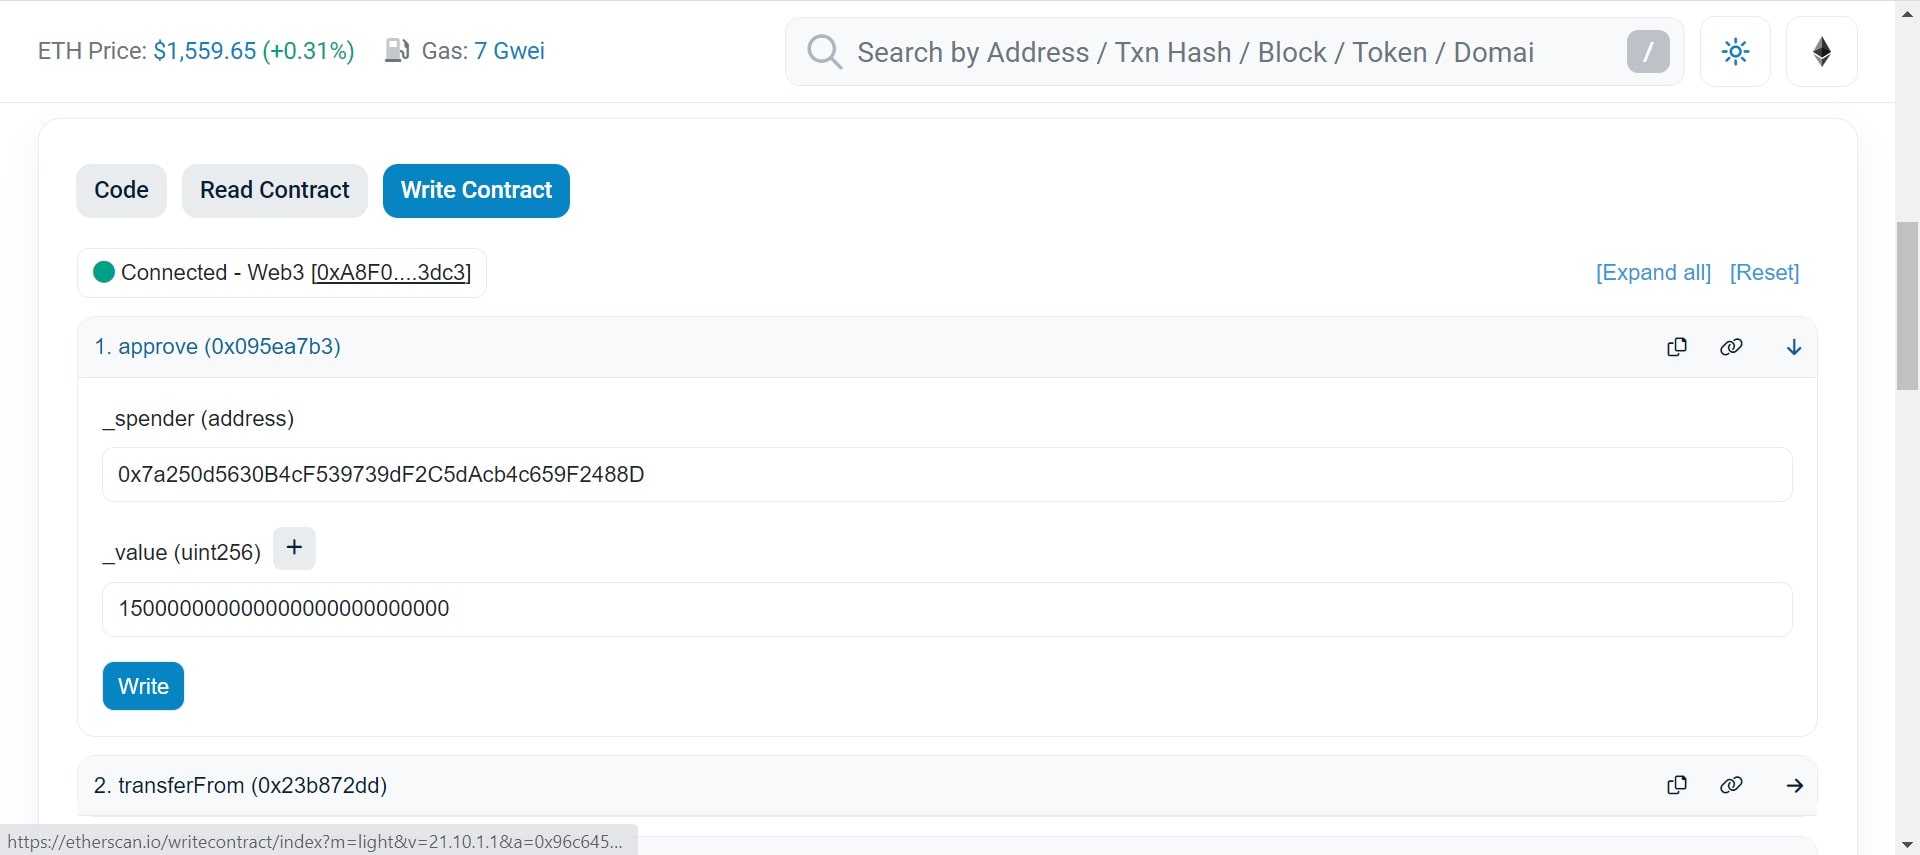
After this, in the block scanner you need to find the address of the router that we just used in the approve() function. Next go to the "Code" tab -> "Write Contract"
* Make sure your wallet is connected!
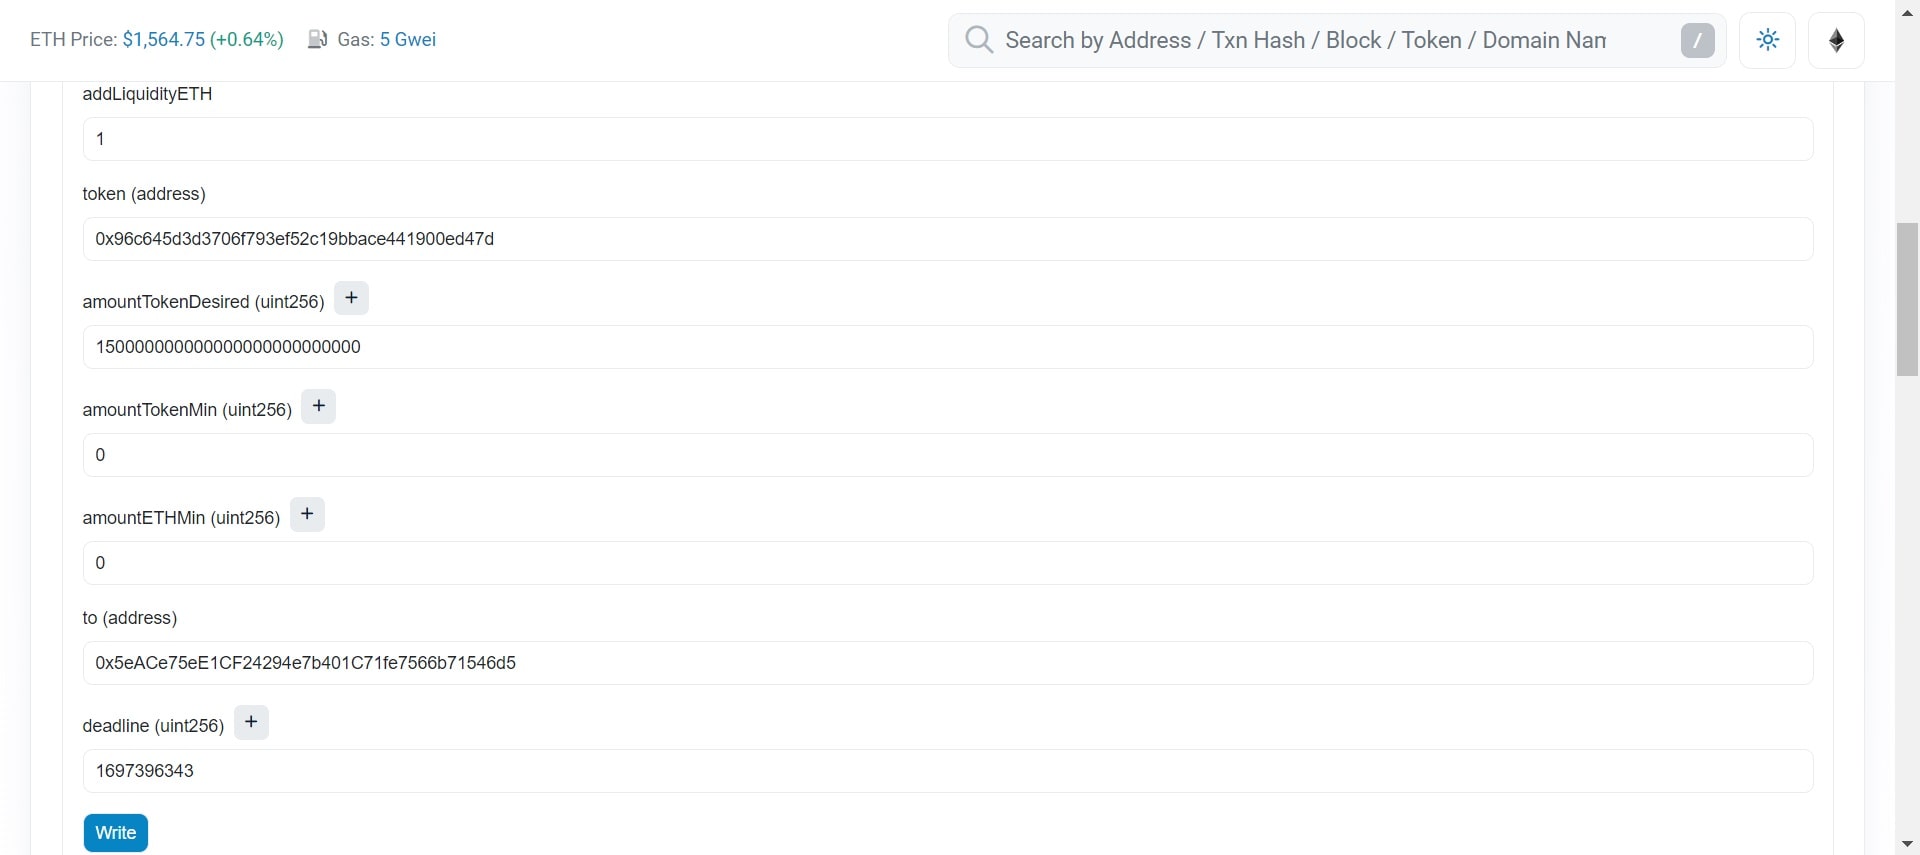
Now find a function called addLiquidityETH. As a rule, it is second from the top.
Now you'll have to fill out a few fields, but don't worry! It's easier than it might seem.
addLiquidityETH is the amount of ether that I am willing to provide as liquidity. In this case I chose 1 ETH
token - smart contract address of your token
amountTokenDesired - the number of tokens that I want to provide for liquidity. I copied this value from the previous step.
amountTokenMin and amountETHMin - can be set to 0.
to - your wallet address. It will receive LP tokens that represent your share in the liquidity pool.
deadline - transaction deadline in UNIX timestamp format. Take the current time from unixtimestamp.com ➥ and add 1200 to it. This will be the optimal value.
And so, having filled in all the fields, you can click on the “Write” button and execute the function.
Attention!
If the transaction fee is unnaturally high, there is a high chance that it will fail and you will lose money. We strongly recommend that you carefully double-check the steps you have completed before submitting your transaction.

📰 MORE TOP HEADLINES
